

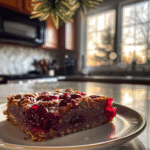
When the holiday season rolls around, there’s something magical about the aroma of freshly baked treats wafting through the house. Christmas Cherry Bars: A Festive Holiday Treat embodies that magic, combining sweet cherries, buttery crust, and a sprinkle of powdered sugar that makes every bite feel like a warm hug. easy slow-cooked butter chicken sweet and savory chicken tenders Picture this: biting into a soft, cherry-filled bar with a deliciously crumbly base while your favorite holiday tunes play in the background.
Every time I make these bars, they remind me of my grandmother’s annual holiday baking spree. The way she would dance around the kitchen while flour dusted her apron was nothing short of enchanting. These cherry bars quickly became my family’s favorite holiday treat, and the laughter shared over them is irreplaceable during those chilly winter evenings. For more inspiration, check out this Thanksgiving Cranberry Turkey Stuffing Balls recipe.
Why You'll Love This Recipe
- These Christmas Cherry Bars are easy to prepare and perfect for any gathering
- Their vibrant red filling adds visual appeal to your dessert table
- Enjoy their delightful flavor profile that balances sweetness with a hint of tartness
- They are versatile enough for festive occasions or just because you deserve a treat!
I still remember my cousin’s face when he took his first bite of these bars; it was pure bliss mixed with a little bit of disbelief that something so good could exist.

Essential Ingredients
Here’s what you’ll need to make this delicious dish:
-
All-Purpose Flour: This is your foundation for the crust; make sure to sift it for lightness.
-
Granulated Sugar: Just the right amount to sweeten without overpowering the cherry filling. For more inspiration, check out this Sweet Potato Au Gratin recipe.
-
Baking Powder: Essential for that perfect rise; don’t skip it if you want fluffy bars!
-
Salt: A pinch enhances all flavors beautifully; trust me on this one.
-
Unsalted Butter: Use cold butter to get that flaky texture in your crust; it’s worth it.
-
Fresh Cherries or Cherry Pie Filling: Choose ripe cherries for an authentic taste or opt for filling when you’re short on time.
-
Powdered Sugar: For a sweet finishing touch that makes everything look and taste fancier.
The full ingredients list, including measurements, is provided in the recipe card directly below.
Let’s Make It Together
Preheat your oven to 350°F (175°C). Grease an 8×8-inch baking dish with nonstick spray to ensure easy removal later on. perfect main dish for the holidays. spicy chicken pasta option.
Create the Crust: In a large mixing bowl, combine flour, sugar, baking powder, and salt. Mix well until evenly blended. Cut in cold butter using a pastry cutter until the mixture resembles coarse crumbs.
Add Water to Form Dough: Gradually add cold water one tablespoon at a time until the dough comes together but isn’t sticky. You want it nice and firm yet pliable.
Press Into Baking Dish: Take about two-thirds of your dough and press it evenly into the bottom of the prepared baking dish to form a solid base. Make sure it’s compact but not overly dense.
Add Cherry Filling: Evenly spread fresh cherries or cherry pie filling over the crust layer, ensuring each bite has plenty of juicy goodness tucked inside.
Crumble Remaining Dough on Top: With your remaining dough, crumble it over the cherry layer like you’re creating an edible snow blanket—this will create a delightful texture contrast.
Bake Until Golden Brown: Bake in preheated oven for 30-35 minutes until golden brown and bubbly. The aroma will be irresistible—try not to eat them before they cool!
Once cooled completely, dust generously with powdered sugar and slice them into squares. Serve them during cozy family gatherings or as an unexpected surprise treat after dinner.
Enjoy these Christmas Cherry Bars: A Festive Holiday Treat that offers warmth not just from its flavors but also from cherished memories shared around them!
You Must Know
- Christmas Cherry Bars are not just a dessert; they are a festive joy packed with flavor and nostalgia
- The combination of sweet cherries, buttery crust, and a hint of almond makes every bite delightful
- Perfect for holiday gatherings and sharing with loved ones
Perfecting the Cooking Process
Start by preparing your cherry filling while the crust bakes. This ensures both components are ready to assemble seamlessly.

Add Your Touch
Feel free to swap cherries for blueberries or add a sprinkle of coconut for a tropical twist. Personalizing this recipe can create delicious surprises.
Storing & Reheating
Store leftover bars in an airtight container at room temperature for up to three days. Reheat in the oven for that freshly baked taste.
Chef's Helpful Tips
- For the best texture, let the bars cool completely before cutting them
- This prevents them from falling apart!
- Use fresh cherries when possible, as they provide superior flavor compared to canned ones
- Don’t skip the almond extract; it elevates the entire dessert!
Sharing Christmas Cherry Bars with family brings back memories of baking marathons in my grandma’s kitchen, where laughter and flour flew everywhere.

FAQ
Can I use frozen cherries for Christmas Cherry Bars?
Absolutely! Just thaw and drain them well before using to avoid excess liquid.
How do I know when my cherry bars are done baking?
They should be golden brown on top, and the filling will bubble slightly around the edges.
Can I make these bars ahead of time?
Yes! They can be made a day in advance and stored covered at room temperature.
Christmas Cherry Bars: A Festive Holiday Treat
- Total Time: 50 minutes
- Yield: Makes approximately 16 servings 1x
Description
Indulge in the warmth of the holiday season with these Christmas Cherry Bars. Bursting with sweet cherries and nestled in a buttery, crumbly crust, each bite is a delightful experience reminiscent of cherished family gatherings. Topped with a dusting of powdered sugar, these bars are not only visually appealing but also incredibly easy to prepare, making them the perfect addition to your festive dessert table.
Ingredients
- 1 ½ cups all-purpose flour
- ½ cup granulated sugar
- 1 tsp baking powder
- ¼ tsp salt
- ½ cup unsalted butter (cold, cubed)
- 3 tbsp cold water (or as needed)
- 2 cups fresh cherries (pitted) or cherry pie filling
- ½ cup powdered sugar (for dusting)
Instructions
- Preheat your oven to 350°F (175°C) and grease an 8×8-inch baking dish.
- In a large bowl, combine flour, sugar, baking powder, and salt. Cut in cold butter until the mixture resembles coarse crumbs.
- Gradually add cold water, mixing until the dough is firm yet pliable.
- Press two-thirds of the dough into the bottom of the prepared dish. Spread cherries evenly over the crust.
- Crumble remaining dough on top to create a textured layer.
- Bake for 30-35 minutes until golden brown and bubbly. Let cool completely before dusting with powdered sugar and slicing.
- Prep Time: 15 minutes
- Cook Time: 35 minutes
- Category: Dessert
- Method: Baking
- Cuisine: American
Nutrition
- Serving Size: 1 square (50g)
- Calories: 160
- Sugar: 9g
- Sodium: 50mg
- Fat: 7g
- Saturated Fat: 4g
- Unsaturated Fat: 2g
- Trans Fat: 0g
- Carbohydrates: 22g
- Fiber: 1g
- Protein: 2g
- Cholesterol: 15mg
Leave a Comment